
There are few things as satisfying as stringing an arrow to your homemade bow.
Today, making your own arrows for your own bow is more accessible than ever. Be it a compound bow, a more simple bow like the recurve bow, a long bow or a homemade diy bow. In this article, we provide you with a step by step complete guide to making your own diy arrows.
We’ll cover how to make arrows from scratch and how to assemble pre-made parts.
The Home-Made Arrow
When most people talk about making their own diy arrows, what they are really referring to is assembling their arrows.
They purchase all of the component parts from various manufacturers and then simply put them together.
That is an enjoyable and rewarding experience. However, creating your own arrows from scratch is infinitely more so.
You probably won’t want to use home-made arrows in competition, but they will do the job when you are in need of some extra target practice arrows.
To make your own diy arrows from scratch, you will need the following tools:
- A saw
- A vise
- A Dremel tool
- Sandpaper
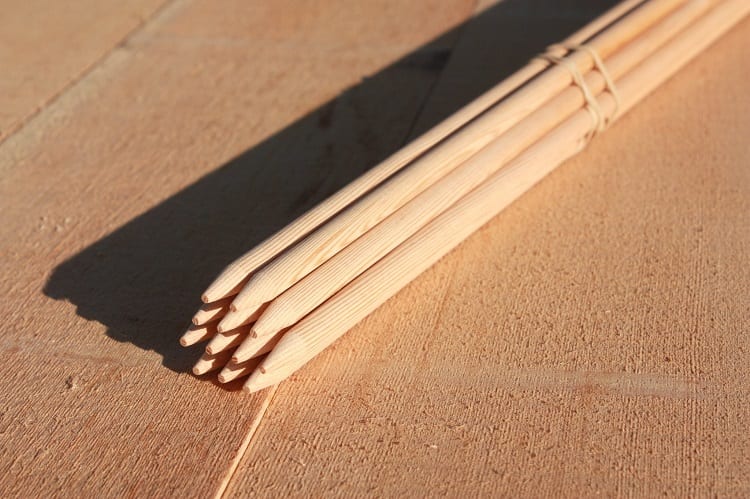
The Shaft
Many small tree branches grow nearly straight. Freshly cut branches are pliable and can be straightened out by bending them against your knee.
Alternatively, you can soften the branch by heating it on an open flame or by using steam to do the job.
If you opt for an open flame, be sure to wet the wood before heating it.
Once you have it as straight as you can get it, debark the branch and then whittle it down to the correct diameter for use as an arrow.
The center of gravity of a 29-inch arrow is 18.5 inches from the nock. This means that the arrow is front end heavy.
To achieve this effect, put the nock on the thinner end of the arrow.
You can use natural materials like bamboo for your arrow shafts, but be sure that it is thick enough.
River cane, which is actually a type of bamboo is ideal. When the wood dries, the shaft will become lighter.
The Fletching
Use a Dremel tool to cut the groove on the nock. You can also use a hacksaw to make the slits for the fletchings to slip into.
Cut a 2-inch slit and then apply glue to the slit. Insert the fletchings and then put on more glue.
Cut the fletching from a piece of transparent plastic, such as the type used to cover table cloths.
You can use actual feathers for the fletching. However, you will generally find that plastic fletchings are more accurate
In order to make arrows that shoot accurately, they must be straight, of uniform weight, and match the stiffness of your powerful bow.
This requires a lot of time and patience. Arrows that are made in a hurry will almost invariably not be straight.
They will also no have a uniform weight. You can compensate for a badly weighted arrow by aiming high.
However, trying to compensate for the left/right placement will be difficult because the arrow building could be bent to the left and downward, or to the right and upward, or some other way.
Because there are two vanes, the arrow can be nocked in two ways. This adds another set of variables to the flight characteristics of the arrow.
How to Make Your Own Arrowhead – Basic Steps
A few hundred years ago making our own primitive arrows was a survival skill that may well have determined whether your family ate or starved, lived or died.
Today, it’s a novelty that provides a lot of satisfaction. Arrowhead making is officially known as Flint Knapping.
It involves making arrowheads from stone. This allows you to make an arrowhead in the wild with absolutely no tools, no power tools in the wild.
Let’s find out how to do it . . .
Step One: Break open the source rock
Your source rock should be quite brittle with a fine grain, a uniform texture and no seams. Good rocks to use as arrowheads include:
- Flint
- Chert rock
- Chalcedony
- Quartzite
To break off a portion of the rock, tap the source rock with a harder rock. Listen to the sound produced.
Then strike again with a goal of getting flakes to come off. Your hammer rock needs to be round and easy to grip in your right hand.
Strike a part of the source rock that is close to an edge and has an angle of less than 90 degrees.
Step Two: Strike flakes of rock off the core
You have two options for removing the flakes from the source rock.
The first is to sit with your legs spread apart and the rock supported by one thigh.
Alternatively, crouch alongside a tree with the rock against its base.
Now hammer with forceful blows to break off pieces that are big enough for arrowheads.
Keep going until you have about a dozen good sized flakes.
Step Three: Shape the flake into an arrowhead
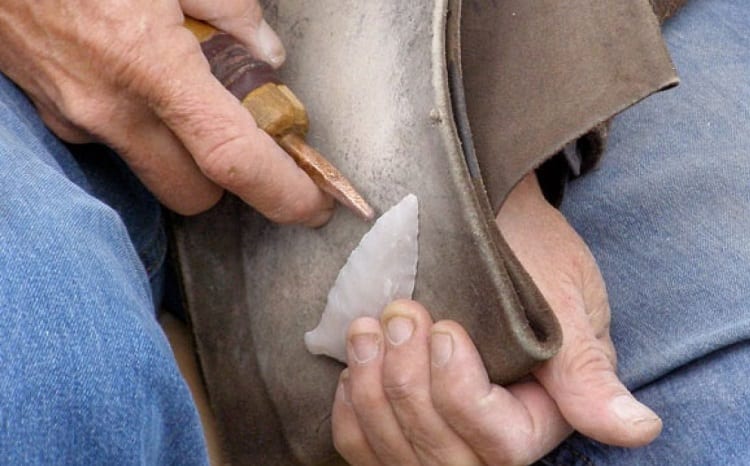
You can shape your arrowhead with a pressure shaping tool. You can make this by attaching a cooper nail to a piece of wood.
Apply pressure to the shaping tool at a point that is below the center line of the flake to break off a piece.
Then turn the arrowhead over and make a symmetrical flake on that side.
Repeat this process as you move around the edge of the head until you have shaped it into a triangular point.
Push the pressure flaking tool against a point that is below the center line of the flake with enough force to pop off a small piece of the arrowhead.
Turn the arrowhead over and create a roughly symmetrical flake on the other side, where the “flake scar” from the first flake was formed is.
Repeat, moving around the edge of the arrowhead, carefully shaping it to a triangular point.
Step Four: Notching
Notches need to be made on the sides of the arrowhead to tie them to the shaft.
Do this by carving gaps on the sides by way of pressure flaking and abrading.
Assembling Arrows
Putting together your own arrows is easy to learn, a fun project, with little effort..
Doing so will save you quite a lot of money in comparison to buying arrows fully made.
Getting hold of your component parts is easier now than ever, thanks to the internet, check for the best online prices, for the best deals and with free shipping if possible.
When it comes to commercially bought arrow shafts, there are a number of options.
Woods such as cedar are popular. Arrows may also be made from aluminum, steel tubing, pvc pipe, fiberglass, carbon, a combination of aluminum and carbon or other multi-materials.
You can get all of the parts that you’ll need to make your arrows from your local archery store.
If you don’t have an archery store in your town, you will find a number of websites where you can get the gear you need.
What do you need in the first place?
Tools
The following list of tools and supplies may seem daunting.
The tremendous increase in the popularity of archery and the greater availability of materials to make your own arrows has brought with it a massive increase in tools and supplies.
This list is just the tip of the iceberg, but will provide you with what you need to get started.
- Pliers (small)—necessary for holding any type of point, including a broadhead, as it is being attached to the arrow with hot melt cement.
- Alcohol burner—to melt hot melt cement to attach points.
- Tapering tool—to trim nock end and point of arrow for attaching nocks and points.
- Scale—to weigh arrow shafts and finished arrows in grains (1ounce equals 437.5 grains).
- Fletching jig—to mount feathers on the shaft perfectly every time.
- Small sharp knife—for incidental use.
- Hobby saw—for cutting wood shafts to length.
- Spine tester—tool to discover the spine of arrow shafts.
- Feather burner or chopper—for shaping feathers purchased full-length. Feathers may also be purchased ready to glue onto the shaft.
- Dipper—for dipping arrow shafts to coat them. Some are just simple tubes; there are also special dippers such as the Big Dipper (35-inch) for full coverage and Little Dipper (15-inch) for cap-dipping, with large enough reservoirs to dip a dozen shafts before refilling.
- Dipper cap (a gasket with holes that screws onto the dipper top)—does a perfect job of applying just the right amount of coating to a shaft.
- Arrow dipping rack—an essential item; holds dippers perfectly so shafts can be dipped quickly. Comes usually as a simple kit.
- Arrow boxes—after a fine set of arrows is constructed, these boxes prevent damage; they’re self-locking with foam dividers to keep feathers from rubbing against each other.
- Crester—optional but worth the effort to produce high-class finished arrows. These little machines aren’t cheap, but many have earned their keep when an archer found he or she had the skill to make a saleable finished arrow with beautiful cresting.
- Cresting brushes—special design for the application of very fine lines.
- Cresting paints—specially formulated for arrow cresting.
Materials
- Glue—Duco cement, Arrow Mate, Fletch-Tite, Barge Cement, and many similar products from numerous companies are used. Check to be sure the glue is compatible with the materials you are using (usually noted in cata-logs or with instruction sheets) when choosing a glue.
- Feather fletching tape—requires only a drop of glue fore and aft on the feather.
- Hot melt cement—perfect for attaching points.
- Gasket lacquer—ideal for sealing the wood shaft to thwart moisture; dries almost instantly. More choices are also viable such as Thunderbird Sealer, which applies like a lacquer but dries to polyurethane. Other sealers
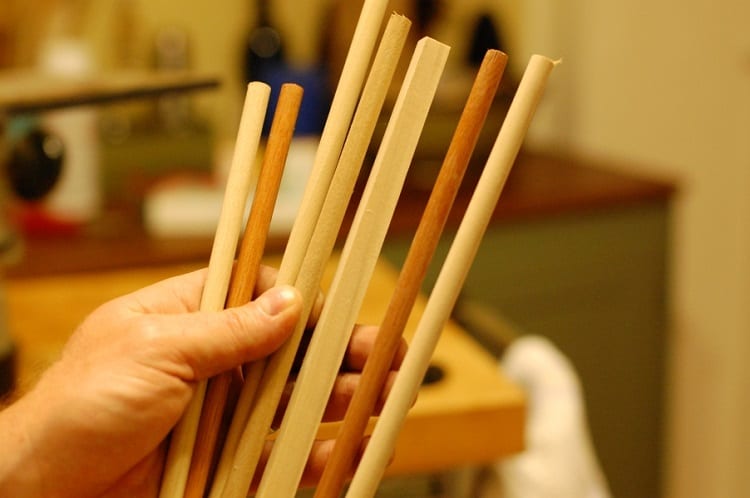
The Shaft
You can buy pre-finished shafts that are stained sealed and crested. The nick ends are tapered and the shafts are hand spined.
All that you will have to do is to cut the shaft to length, add the fletching, taper the tip and then add a tip.
Wooden Shafts
Despite the range of different types of shaft materials available today, wooden shafts are still a great way to go.
The best material to use for arrow shafts is cedar. Tapered compressed cedar is even better.
These cedars are compressed and the nock end is even reduced in diameter.
These are usually tapered from 11/32nds to 5/16ths for about the last nine inches of the arrow.
These shafts will remain straight forever, so long as they are stored in low humidity conditions.
However, compressed cedar shafts will withstand humidity better than other types of wooden shafts.
As well as being able to be molded into a very straight arrow, cedar is also very strong.
That makes it one of the most splinter-proof shafts materials out there. Use a flat surface to remove the sharp edges.
Cedar produces a medium weight arrow with a stiff spine. This will allow it to fly straight and true.
Another good choice for a wooden shaft, while not as good as cedar, is Sitka spruce.
This wood is much like cedar in behavior. It is strong and consistent but not as humidity resistant as cedar.
Chundoo is another good arrow wood. It has good elasticity, meaning it tends to bend on impact rather than splintering.
It turns into a straight shaft with a little handwork and it finishes just as smooth as cedar or Sitka spruce.
It becomes a respectable arrow that takes finishes well, and it can be crested just like other woods.
Fourth on our list of best shaft timbers is Douglas Fir. This is a tough wood that can produce a straight grain, but you will need to be selective in finding it.
Another possibility is larch. The tamarack tree, a kind of larch, makes a strong, durable arrow.
This wood grows in colder regions of the Northern Hemisphere such as the forests of Russia and Canada.
It comes in more than one species. One of the larch’s attributes is that it is waterproof. It is also tough and durable.
Larch branches are usually knot-free, which is important when making wood into arrow shafts.
Our final wooden shaft option is Ash. Arrows made of ash are straight and tough.
Ash is, after all, noted for its strength as a wood. It is also very dense. Another property of ash is that it is very elastic.
This may allow an ash arrow to withstand impact that would shatter other wooden arrows.
One problem with ash is that the finished arrow is quite heavy.
Selecting Your Shafts
If your budget can handle it, you should buy your arrow shafts a hundred at a time.
When you make them, do so in ten sets of ten. When your shafts arrive, your first task should be to sort through them.
You want to check by spine and weight to see if they are all uniform. The shaft manufacturer will not be able to weigh every individual shaft.
Sort your shafts by weight in grains. Then examine them for the grain structure.
The ideal shaft has a very straight grain when viewed from the side.
A slightly wavy grain is acceptable if you make sure to use the best portions of the shaft.
But if the grain is wavy, you should weed them out. These shafts are more prone to breaking.
If you are going to be using your arrows for competition shooting, it is best to go with tapered shafts.
For practicing in the field, however, untampered shafts will be fine.
The Feathers
You can buy your feathers either pre-cut or full length. The advantage of full length feathers is that you are able to cut them to shape that you want.
To do this job most effectively you should invest in a feather die cutter. They allow you to cut the feather in up to 15 different configurations.
The sharp blade will cut a perfect feather every time. Feathers are available in a huge range of colors and shapes.
Readying the Shafts
You can now dye your shafts, if that is your preference. Use a quality leather dye such as Tandy.
Dab a small amount of stain on a clean cloth and rub the stain into the unfinished shaft smoothly.
For your protection and to avoid a mess, be sure to wear plastic or rubber gloves.
Leave the shafts to dry for about half an hour. Then seal the shaft with a lacquer, applying three coats.
Tapering the Ends
Cut your shaft to length. Remember that the shaft must be cut at least one-half to a full inch longer than the draw length of the bow so the point will be a little distance from the bow hand.
Then use your tapering tool to give the nock end an 11.5-degree taper. At the same time, give a 5-degree taper to the point end.
Screw the nock in place so that when it is glued later the grain of the shaft will run horizontal to the strike plate.
Applying the Feathers
Choose the feathers that you want to use for this particular arrow. Then prepare your fletching jig.
You should use a straight clamp for straight-offset mounting of feathers.
The most functional jigs are those that have settings for three or four feather arrows. A favorite of many archers is the Bitzenburger fletching jig.
Now set the desired fletching jig. If you set it at 120-degrees, the three feathers will end up equidistant from each other on the shaft.
Position each feather’s back end to align with one of the index lines on the clamp.
Mark that index line with a soft lead pencil to remind you where the back end must rest in the clamp.
This will make sure that every feather’s back end is located ion the same spot.
Be sure to leave enough room from the back of the feather to allow for the nock – about a quarter of an inch is ideal.
Now put the clamp on the jig. Adjust so that the feather lies properly along the arrow shaft.
You are now ready to glue the feathers to the shaft. Scratch the base of the feather lightly with your finger to roughen it up.
Now apply a thin bead of glue along the base of the feather.
Now, starting from the back, gently roll the clamp forward onto the shaft so that the base of the feather makes full contact.
Do not press down or you will eject too much glue out to the sides.
You may need to use a pin or pencil point to press down a section of the feather that refuses full contact.
Leave the feather to dry for thirty minutes. Then gently pinch the clamp open and lift it away from the jig.
Now carefully turn the rotating knob of the jig to index it to the next feather. Attach the other two feathers in the same manner.
Gluing the Nock
You are now ready to glue the nock in place. To do this you should place the arrow on your bow string.
Make any slight adjustment so that the nock is perfectly aligned with the hen feather.
Now make a small mark from the nock to the shaft to ensure that the nock is glued precisely where it should be.
Applying the Point
Start your alcohol stove and then melt a small amount of hot melt cement stick.
Smear a dab of hot melt on the taper of the arrow. This will dry quickly to become hard.
Now heat the point over the alcohol burner, holding it with pliers.
The very warm to mildly hot point is placed on the arrow taper and rotated to evenly spread, the hot melt cement inside the ferrule of the point.
After setting the point, spin the arrow on the point to make sure it does not wobble.
If it wobbles, adjust the point with the pliers (it will still be hot) and spin again until the wobble is gone.
Applying the Cresting
The last touch is to apply the cresting to your arrow. These are the pretty stripes around the middle of the arrow.
Cresting was first used in ancient times to identify the owner. Today cresting is simply used for decorative purposes.
Your cresting machine will come with full instructions, so simply follow those instructions to apply perfect cresting to your arrow.
One your cresting is applied, you have just made an arrow!
A Complete Step-By-Step Instructions
You now have everything you need to make your own diy arrows, either from scratch or using purchased materials.
Use this article as your resource on into the future as you pack your quiver with high quality, low priced arrows